Adding a OLED screen to the ESP-01
April 26, 2020

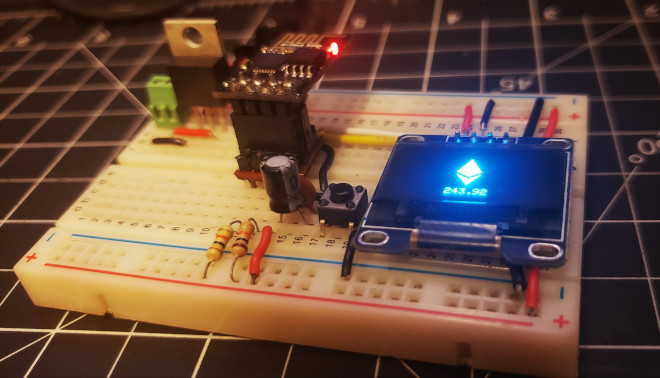
In this post we are going to add a screen to the ESP-01 to display data obtained from a webservice. The ESP-01 is limited in the number of GPIO pins available, with up to 4 pins availables if we count the TX and RX pins (but once you use those, you will no longer be able to use the serial monitor, as those pins will become GPIO and not transmit serial data). This might be a stopper for many projects, but not for this particular scenario, if we use I2C.
I2C is a protocol that lets multiple secondary chips communicate with a primary chip. It only requires two connections to exchange information. For this scenario I will use an I2C OLED screen that will be connected to GPIO0 and GPIO2 pins on the ESP-01.
Tools
- Multimeter (required to test continuity and verify voltage)
- Wire strippers or an exacto knife
Materials
- ESP-01
- Some way to program the ESP-01, either following the previous tutorial, or using an UART programmer Breadboard
- ESP-01 breadboard adapter (Can be DIY)
- 1 tactile switch
- 2 10KΩ resistors
- 20 gauge single wire cables or jumper cables
- A 3.3v power source, or a 5V power source and a
LM1117Tvoltage regulator to drop voltage to 3.3 - 1 100μF electrolytic capacitor
- 1 0.1μF ceramic capacitor
- 1 128x64 I2C OLED screen
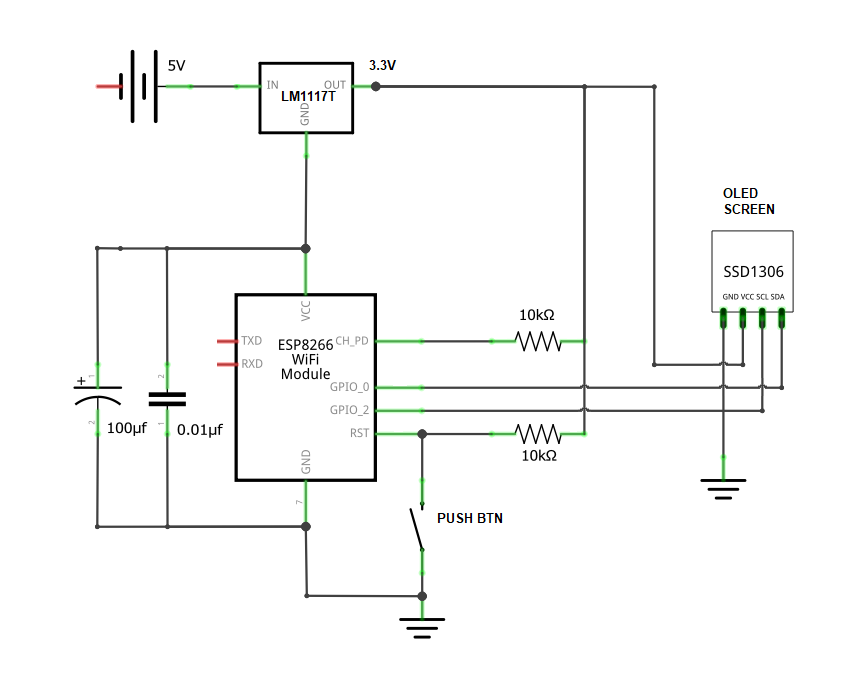
The schematic

- The tactile button is used as a reset switch connecting the
RSTpin toGNDwhen pressed, andRSTtoVCCthrough a 10K pull up resistor. GPIO0is connected toSCL, andGPIO2toSDA.CH_PDis pulled to 3.3V via a 10K resistor- I added some decoupling capacitors. The
ESP-01uses a lot of current, so I added the 100μF capacitor to act as a power reserve and keep the voltage stable and the 0.1μF to filter noise. These capacitors have to be close to the ESP - Also, a
LM1117Tvoltage regulator is used to drop the voltage from 5V to 3.3V
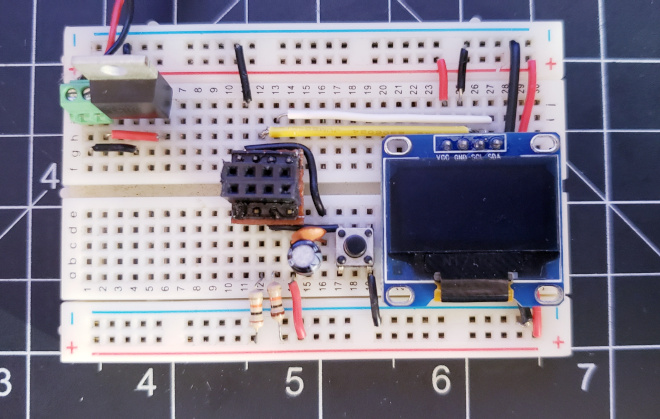
This schematic will look similar to this picture once reproduced in a breadboard

Programming
Install the following libraries, via Tools > Manage Libraries
Adafruit GFX Library by Adafruit version 1.7.5Adafruit SSD1306 by Adafruit version 2.2.0ArduinoJson by Benoit Blanchon version 6.15.2esp8266 by ESP8266 Community version 2.6.3(you should have this installed from the previous tutorial)
With these libraries we should pretty much be able to communicate with any webservice, parse its response and display it on the OLED screen. Here is some example code that uses these libraries to connect and obtain the price for ETH from cryptocompare.com.
#include <Wire.h>#include <Adafruit_GFX.h>#include <Adafruit_SSD1306.h>#include <ESP8266WiFi.h>#include <WiFiClientSecure.h>#include <time.h>#include <ESP8266HTTPClient.h>#include <ArduinoJson.h>#define SCREEN_WIDTH 128 // OLED display width, in pixels#define SCREEN_HEIGHT 64 // OLED display height, in pixels// Declaration for an SSD1306 display connected to I2C (SDA, SCL pins)#define OLED_RESET -1 // Reset pin # (or -1 if sharing Arduino reset pin)Adafruit_SSD1306 display(SCREEN_WIDTH, SCREEN_HEIGHT, &Wire, OLED_RESET);const char *ssid = "YOUR_WIFI_SSID";const char *pass = "YOUR_PASSWORD";// SSL certificate of cryptocompare.comconst char digicert[] PROGMEM = R"EOF(-----BEGIN CERTIFICATE-----MIIEADCCAuigAwIBAgIBADANBgkqhkiG9w0BAQUFADBjMQswCQYDVQQGEwJVUzEhMB8GA1UEChMYVGhlIEdvIERhZGR5IEdyb3VwLCBJbmMuMTEwLwYDVQQLEyhHbyBEYWRkeSBDbGFzcyAyIENlcnRpZmljYXRpb24gQXV0aG9yaXR5MB4XDTA0MDYyOTE3MDYyMFoXDTM0MDYyOTE3MDYyMFowYzELMAkGA1UEBhMCVVMxITAfBgNVBAoTGFRoZSBHbyBEYWRkeSBHcm91cCwgSW5jLjExMC8GA1UECxMoR28gRGFkZHkgQ2xhc3MgMiBDZXJ0aWZpY2F0aW9uIEF1dGhvcml0eTCCASAwDQYJKoZIhvcNAQEBBQADggENADCCAQgCggEBAN6d1+pXGEmhW+vXX0iG6r7d/+TvZxz0ZWizV3GgXne77ZtJ6XCAPVYYYwhv2vLM0D9/AlQiVBDYsoHUwHU9S3/Hd8M+eKsaA7Ugay9qK7HFiH7Eux6wwdhFJ2+qN1j3hybX2C32qRe3H3I2TqYXP2WYktsqbl2i/ojgC95/5Y0V4evLOtXiEqITLdiOr18SPaAIBQi2XKVlOARFmR6jYGB0xUGlcmIbYsUfb18aQr4CUWWoriMYavx4A6lNf4DD+qta/KFApMoZFv6yyO9ecw3ud72a9nmYvLEHZ6IVDd2gWMZEewo+YihfukEHU1jPEX44dMX4/7VpkI+EdOqXG68CAQOjgcAwgb0wHQYDVR0OBBYEFNLEsNKR1EwRcbNhyz2h/t2oatTjMIGNBgNVHSMEgYUwgYKAFNLEsNKR1EwRcbNhyz2h/t2oatTjoWekZTBjMQswCQYDVQQGEwJVUzEhMB8GA1UEChMYVGhlIEdvIERhZGR5IEdyb3VwLCBJbmMuMTEwLwYDVQQLEyhHbyBEYWRkeSBDbGFzcyAyIENlcnRpZmljYXRpb24gQXV0aG9yaXR5ggEAMAwGA1UdEwQFMAMBAf8wDQYJKoZIhvcNAQEFBQADggEBADJL87LKPpH8EsahB4yOd6AzBhRckB4Y9wimPQoZ+YeAEW5p5JYXMP80kWNyOO7MHAGjHZQopDH2esRU1/blMVgDoszOYtuURXO1v0XJJLXVggKtI3lpjbi2Tc7PTMozI+gciKqdi0FuFskg5YmezTvacPd+mSYgFFQlq25zheabIZ0KbIIOqPjCDPoQHmyW74cNxA9hi63ugyuV+I6ShHI56yDqg+2DzZduCLzrTia2cyvk0/ZM/iZx4mERdEr/VxqHD3VILs9RaRegAhJhldXRQLIQTO7ErBBDpqWeCtWVYpoNz4iCxTIM5CufReYNnyicsbkqWletNw+vHX/bvZ8=-----END CERTIFICATE-----)EOF";HTTPClient https;#define LOGO_WIDTH 23#define LOGO_HEIGHT 38const char * apiURL = "https://min-api.cryptocompare.com/data/price?fsym=ETH&tsyms=USD";// ETH logoconst unsigned char eth [] PROGMEM = {0x00, 0x00, 0x00, 0x00, 0x30, 0x00, 0x00, 0x30, 0x00, 0x00, 0x78, 0x00, 0x00, 0x78, 0x00, 0x00,0xfc, 0x00, 0x01, 0xfe, 0x00, 0x01, 0xfe, 0x00, 0x03, 0xff, 0x00, 0x03, 0xff, 0x00, 0x07, 0xff,0x80, 0x0f, 0xff, 0xc0, 0x0f, 0xff, 0xc0, 0x1f, 0xff, 0xe0, 0x1f, 0xff, 0xe0, 0x3f, 0xff, 0xf0,0x3f, 0xff, 0xf0, 0x7f, 0xff, 0xf8, 0xff, 0xff, 0xfc, 0x7f, 0xff, 0xf8, 0x1f, 0xff, 0xe0, 0x07,0xff, 0x80, 0x43, 0xff, 0x08, 0x60, 0xfc, 0x18, 0x38, 0x78, 0x70, 0x1c, 0x00, 0xe0, 0x1f, 0x03,0xe0, 0x0f, 0xcf, 0xc0, 0x07, 0xff, 0x80, 0x03, 0xff, 0x00, 0x03, 0xff, 0x00, 0x01, 0xfe, 0x00,0x00, 0xfc, 0x00, 0x00, 0xfc, 0x00, 0x00, 0x78, 0x00, 0x00, 0x30, 0x00, 0x00, 0x30, 0x00, 0x00,0x00, 0x00};// Set time via NTP, as required for x.509 validationvoid setClock() {configTime(3 * 3600, 0, "pool.ntp.org", "time.nist.gov");resetDisplay();println("NTP time sync: ");time_t now = time(nullptr);while (now < 8 * 3600 * 2) {delay(500);print(".");now = time(nullptr);}Serial.println("");struct tm timeinfo;gmtime_r(&now, &timeinfo);resetDisplay();println("Current time: ");println(asctime(&timeinfo));delay(2000);}void resetDisplay(){display.clearDisplay();display.setCursor(0, 0);}void println(const char * str){Serial.println(str);display.println(str);display.display();}void print(char * str){Serial.print(str);display.write(str);display.display();}void drawCentreString(const char *buf, int x, int y){int16_t x1, y1;uint16_t w, h;display.getTextBounds(buf, x, y, &x1, &y1, &w, &h); //calc width of new stringdisplay.setCursor(x - w / 2, y);display.print(buf);Serial.print(buf);display.display();}void printBTCLogo() {display.drawBitmap((display.width() - LOGO_WIDTH ) / 2,(display.height() - LOGO_HEIGHT) / 2,eth, LOGO_WIDTH, LOGO_HEIGHT, 1);}void fetchURL(BearSSL::WiFiClientSecure *client) {resetDisplay();if (https.begin(*client, apiURL)) {println("Obtaining price...");// start connection and send HTTP headerint httpCode = https.GET();// httpCode will be negative on errorif (httpCode > 0) {// HTTP header has been send and Server response header has been handledSerial.printf("[HTTPS] GET... code: %d\n", httpCode);// file found at serverif (httpCode == HTTP_CODE_OK || httpCode == HTTP_CODE_MOVED_PERMANENTLY) {String payload = https.getString();Serial.println(payload);StaticJsonDocument<200> doc;deserializeJson(doc, payload);String price = doc["USD"];resetDisplay();printBTCLogo();drawCentreString(price.c_str(), 64, 55);display.display();}} else {Serial.printf("[HTTPS] GET... failed, error: %s\n", https.errorToString(httpCode).c_str());display.println(sprintf("[HTTPS] GET... failed, error: %s\n", https.errorToString(httpCode).c_str()));display.display();}https.end();} else {println("[HTTPS] Unable to connect");}}void connect() {BearSSL::WiFiClientSecure client;BearSSL::X509List cert(digicert);client.setTrustAnchors(&cert);setClock();fetchURL(&client);}void setup() {Serial.begin(115200);Wire.pins(0, 2);// SSD1306_SWITCHCAPVCC = generate display voltage from 3.3V internallyif(!display.begin(SSD1306_SWITCHCAPVCC, 0x3C)) {Serial.println("SSD1306 allocation failed");for(;;); // Don't proceed, loop forever}resetDisplay();display.display();delay(100);display.setTextSize(1); // Normal 1:1 pixel scaledisplay.setTextColor(SSD1306_WHITE); // Draw white textdisplay.cp437(true); // Use full 256 char 'Code Page 437' font// We start by connecting to a WiFi networkprintln("Connecting to");println(ssid);WiFi.mode(WIFI_STA);WiFi.begin(ssid, pass);while (WiFi.status() != WL_CONNECTED) {delay(500);Serial.print(".");display.write(".");display.display();}resetDisplay();println("WiFi connected");println(WiFi.localIP().toString().c_str());delay(1000);}void loop() {connect();delay(60000);}
Some things worth noticing are that the ETH logo was generated using this website. There's an NTP step used to obtain the current time, this is necessary for validating the SSL certificate. Also, depending on you screen, you might have to change the I2C address from 0x3C to 0x3D.